
There are five different parameters in Revit that you must understand, especially the difference between project and shared parameters. Why is that? Because there are some limitations for each parameter.
Remember!
Understand the differences among the parameters
Understand which parameters should be used
Understand Parameter Data
Where are they?

The parameters are displayed in the properties palette or type properties dialog. They are everywhere!

In the Parameter Properties, it consists of …
Parameter Type
Built-in Parameter
Project Parameter
Family Parameter
Shared Parameter
Global Parameter
Parameter Data
Name - Parameter name. Make sure to follow OBOS or NBS
Discipline - Architecture (Common), MEP, Structure, Civil
Type of Parameter - Understand the differences such as integer or number or Length
Group parameter under - Where the parameter will be located in Properties palette
Edit Tooltip - Parameter description
Type/Instance - Type parameter will be located in Edit Type, whereas Instance will be visible in the Properties palette
Group Type/Group Instance - Group instance will allow you to change the value in the group, but group type is not.
Categories
Multiple categories can be selected if required.
Definition
Built-in Parameter

Built-in Parameters exist as default and cannot be modified (cannot change name or category). They are normally pre-populated in the default template or project. As they exist in all projects, they can be used instead of shared parameters when agreed.
Project Parameter

Project parameters only exist in the project file and can be added to all categories either single or multiple categories. They cannot be transferred to other projects.
Family Parameter

Family parameters only exist in the family (but can be visible in the project loaded) and can be added to control variable values. They can be used to control the values in the nested families.
Shared Parameter
Shared Parameters can exist in multiple projects and families and are saved in a text file that can be modified (if you are interested in this topic, check this article).
Global Parameter

Global Parameters only exist in the project file as a generic parameter that cannot be assigned to the category. It is often used to control and report values.
What parameters should be used?

Project Parameter
It is ideal for project-specific information. It can filter content in the project schedule.
Shared Parameter
It is ideal for consistent information that can be used for future projects such as scheduling, auditing, and tagging.
Global Parameter
It only exists in a single project and cannot be assigned to the family category. It is ideal for the specific information to be maintained.
Family Parameter
Use for the metadata only.
How to create…
Project parameter?

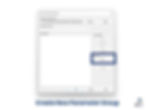
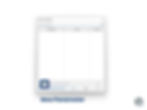
Go to Manage tab and select Project Parameters

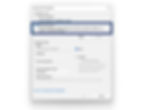
In the Project Parameters dialog, Click the Add… Button.
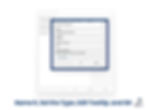
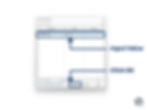
Once the Parameter Properties appears, select Project Parameter in Parameter Type. Fill out all the data and select the desired Category and click OK. In this case, Door is chosen.

Now, the parameter is shown in the dialog, so click OK to complete.
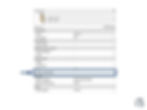
To check the parameter, select one of the doors in the project and find it in Properties. As you can see above, the parameter is successfully assigned to the door category.
Family parameter?

In order to create a family parameter, you need to go to Family Editor by selecting Edit Family in Modify Tab. You can either select a family and edit it or create it from scratch.

When the family editor is active, select Family Types to add Family Parameter, the descriptions shown above.

In the Family Type dialog, the New Parameter button is located in the bottom. To create a new family parameter, click this icon.

Once the Parameter Properties appears, select Family Parameter in Parameter Type. Fill out all the data and click OK.
Now, the parameter is shown in the dialog, so click OK to complete.
Shared parameter?

Go to Manage tab and select Shared Parameter

As there is no shared parameter in the default project (unless you already load it), you need to create the shared parameter file. Once the Edit Shared Parameters dialog appears, Click the Create… button.

The file location should be set and the file should be saved. Make sure the appropriate naming.
Once the file is created, you must create the Parameter Group before making a new parameter. Click the New… button in Groups to create the group.

When the New Parameter Group is popped up, name the parameter group.
When you create the parameter group, you will see the one created in the parameter group. Now, you can create a new parameter by selecting the New… button.
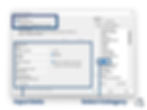
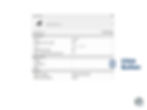
In the Parameter Properties, fill the Name and set the Discipline and Type Parameter. It is recommended to add Tooltip Description to explain the parameter. Note: Once it is created, it cannot be edited or amended in Revit.

The parameter is now appearing in the dialog. Click OK to complete the process.
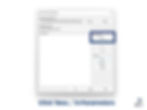
To apply the shared parameter in the project, you need to add it in the Project Parameters. Go to Manage tab, and click Project Parameters.

In the Project Parameters dialog, Click the Add… Button.

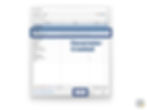
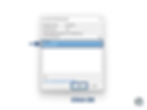
Select the Shared parameter in Parameter Type, and Click the Select… button.
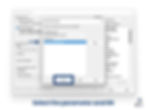
Once the dialog is popped up, select the parameter that you want to add. In this case, select SharedParameterSample and click OK.

Once it is done, Parameter Data and Categories need to be set up. In this case, it will be in the Identity Data and assigned to Door category. Moreover, it is an Instance parameter and values are aligned per group type.

To check the parameter, select one of the doors in the project and find it in Properties. As you can see above, the parameter is successfully assigned to the door category.
Global parameter?

You can find the Global Parameters icon in Manage tab.
In the Global Parameters dialog, Click the New Parameter icon to create a global parameter.

In the Global Parameter Properties dialog, input the name, select Discipline and Type of parameter, assign Group parameter, and Edit Tooltip.
The global parameter requires the value in the Global parameters dialog like the key schedule. You need to define the value here.
Now, we need to assign the global parameter to a family. Let’s do it in a furniture family, but it can be assigned any categories. Select one of the elements and click the small button in Properties.
In the Associate Global Parameter dialog, select the parameter that you created. In the real project, there will be more parameters, so it is important to create an appropriate naming convention so that it explains itself. Once it is selected, click OK.

As you can see in Properties, the global parameter is assigned to the family.
To sum up
Project Parameter should be used for project-specific data
Shared Parameter should be used for schedule and tagging
Family Parameter should be used for family metadata
Global Parameter should be used for project-specific data (non-family)